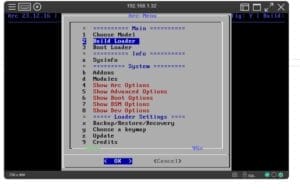
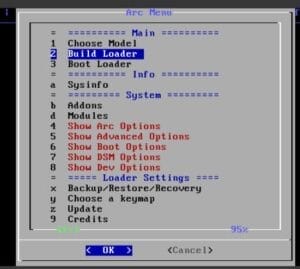
If we come from a previous DSM, or want to do it from scratch, we are going to do it in steps:
- Firstly we download the loader or bootloader
- We burn it with BalenaEtcher
- We introduce the USB into the Nas
- We give the Option: Choose Model. We introduce the model, and follow the steps until the end.
- If you have an original serial number that corresponds to the DSM version you have installed, you can enter it in this step by pressing 3.
If you don’t have any, press 1.
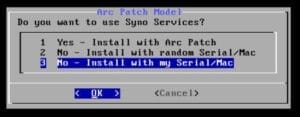
- If you have an original Mac number that corresponds to the DSM version you have installed, you can enter it in this step by pressing 1.
If you don’t have any, press 2.
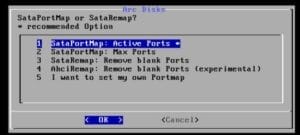
- Now we select the option according to your hard drive configuration.
If you don’t know what I’m talking about, press 1.
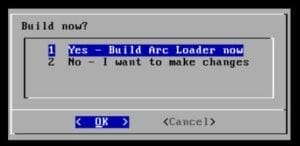
- Finally, we build the boot.
- Now we enter our nas through: finds.synology.com and click on the first option to download the pat online.
- We reboot, wait a few minutes and search for the nas with finds.synology.com and it will let us enter the system.


Update DSM with ARC
When there is any DSM update, if we download and install the update through the DSM Control Panel, when you start the bootloader it will update itself and install the latest version of the bootloader automatically. With this, as long as there is an ARC update adapted to the new version, we will be able to start the updated DSM correctly.
Small updates:
That is, it is recompiled for versions 7.1 update1, update2, update3… you can update from the DSM Control Panel without fear:
– You update, it asks you to Restart…
– You restart and after updating the same Arc bootloader it only updates.
– Start DSM normally.
Big updates:
When there is a new version (For example, from 7.1 to 7.2, 7.2 to 7.3):
– Update from DSM Dashboard
– Then you enter the bootloader and only the bootloader is updated and the new version will be released to compile it manually again.
– Build the booloader with the new version of DMS.
– You restart.
– Start DSM normally.